This is Part 3 of a series that takes a GNOME application from an empty directory to acceptance into GNOME Circle. Part 2 covered GObject’s type system — properties, signals, and the inner/outer type pattern. Now we’ll use everything we learned to build a real application.
From theory to a running window
In Part 2 we built a GObject subclass by hand — a Feed model with properties and signals, no GTK in sight. That was deliberate. Understanding GObject’s inner/outer type split, the ObjectSubclass trait, and the mod imp pattern is the foundation that everything else rests on.
Now we’re going to see those same patterns in context. By the end of this post, you’ll have a running GTK4 + libadwaita application with a header bar, a menu, keyboard shortcuts, and a properly structured project that’s ready for Flatpak packaging. And you won’t have written most of it by hand — GNOME Builder will generate it for you. Our job is to understand what it generated and why.
Creating the project in GNOME Builder
Open GNOME Builder and click Create New Project. Fill in the dialog like this:
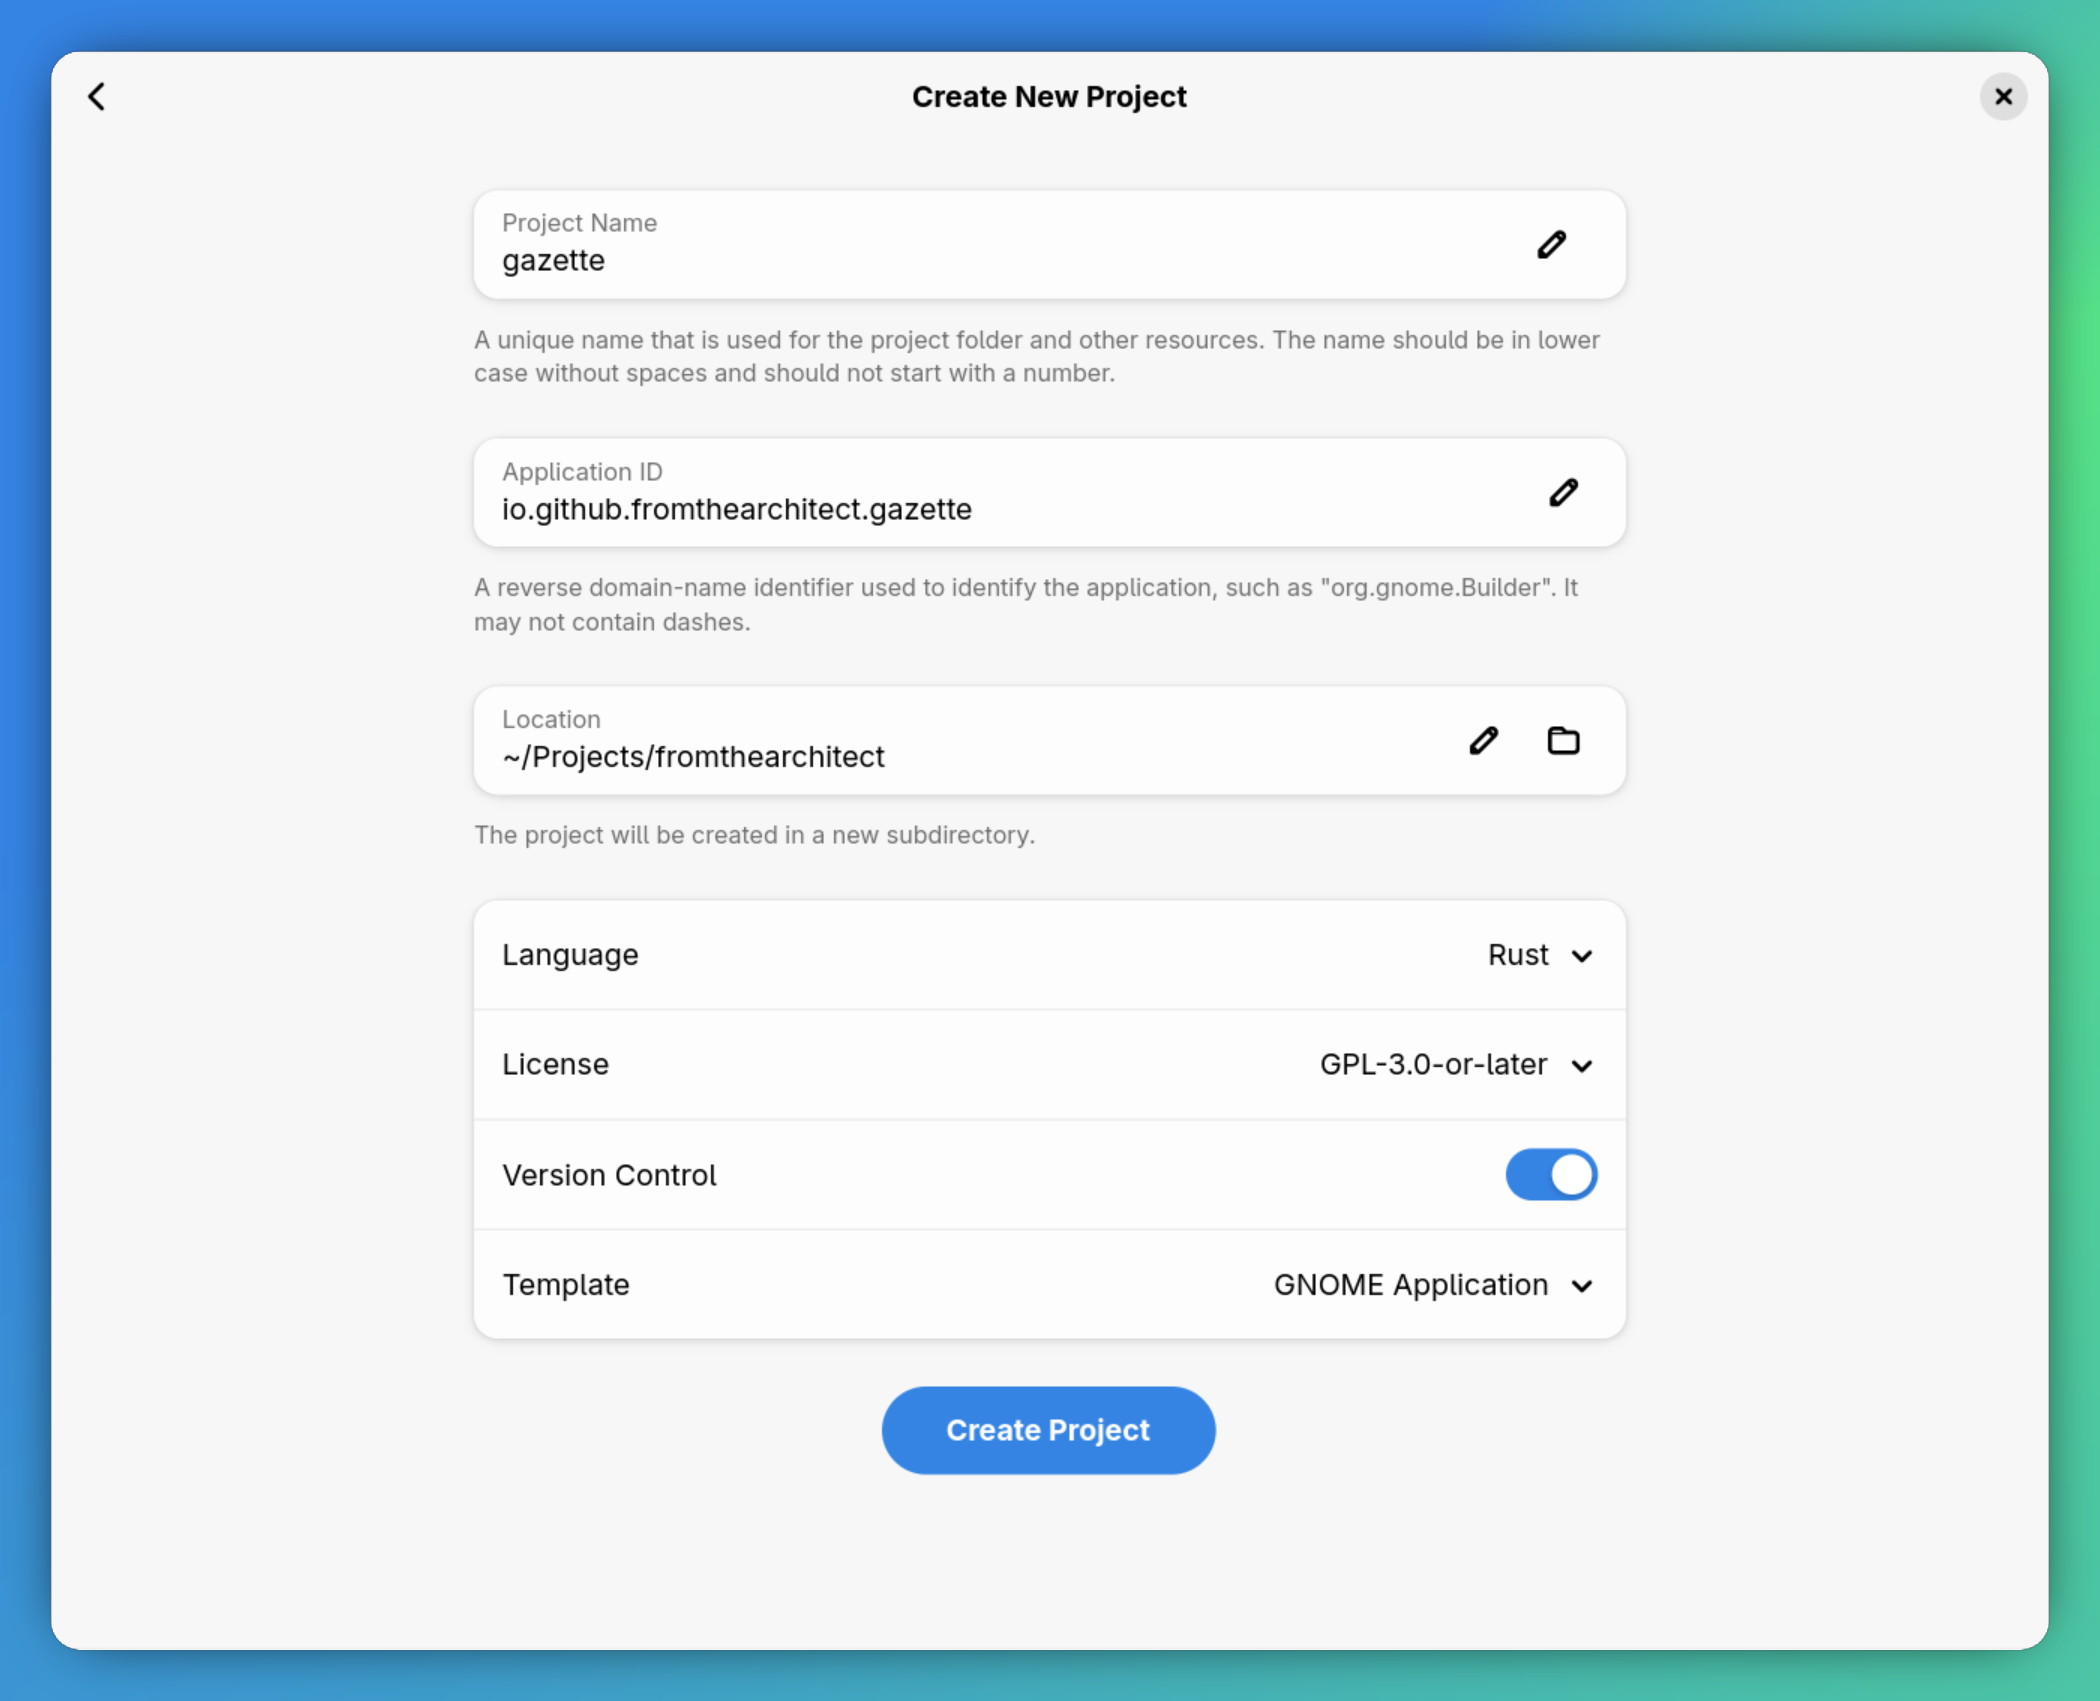
- Project Name:
gazette - Application ID:
io.github.fromthearchitect.gazette - Location: wherever you keep your projects
- Language: Rust
- License: GPL-3.0-or-later
- Version Control: enabled
- Template: GNOME Application
Click Create Project.
A note on application IDs
The application ID is a reverse domain name that uniquely identifies your app across the entire Linux desktop. It’s used for the D-Bus service name, the GSettings schema path, the desktop file name, the icon name, and the Flatpak bundle ID. Everything keys off this single string.
The convention is to use a domain you control. If you’re publishing to a GitHub organisation, io.github.yourorg.yourapp is the standard pattern. If you own a domain, use it: dev.fromthearchitect.gazette would also work. The important thing is that this ID is globally unique and stable — changing it later means renaming dozens of files and updating every reference.
Hit Run
Before we look at any code, hit the Run button (the play icon in the header bar) or press Ctrl+F5. Builder will configure the Flatpak environment, download the SDK if needed, compile the Rust code, bundle the resources, and launch the application.
The first build takes a while — Cargo is downloading and compiling every dependency inside the Flatpak sandbox. Subsequent builds are much faster thanks to caching.
When it finishes, you’ll see this:
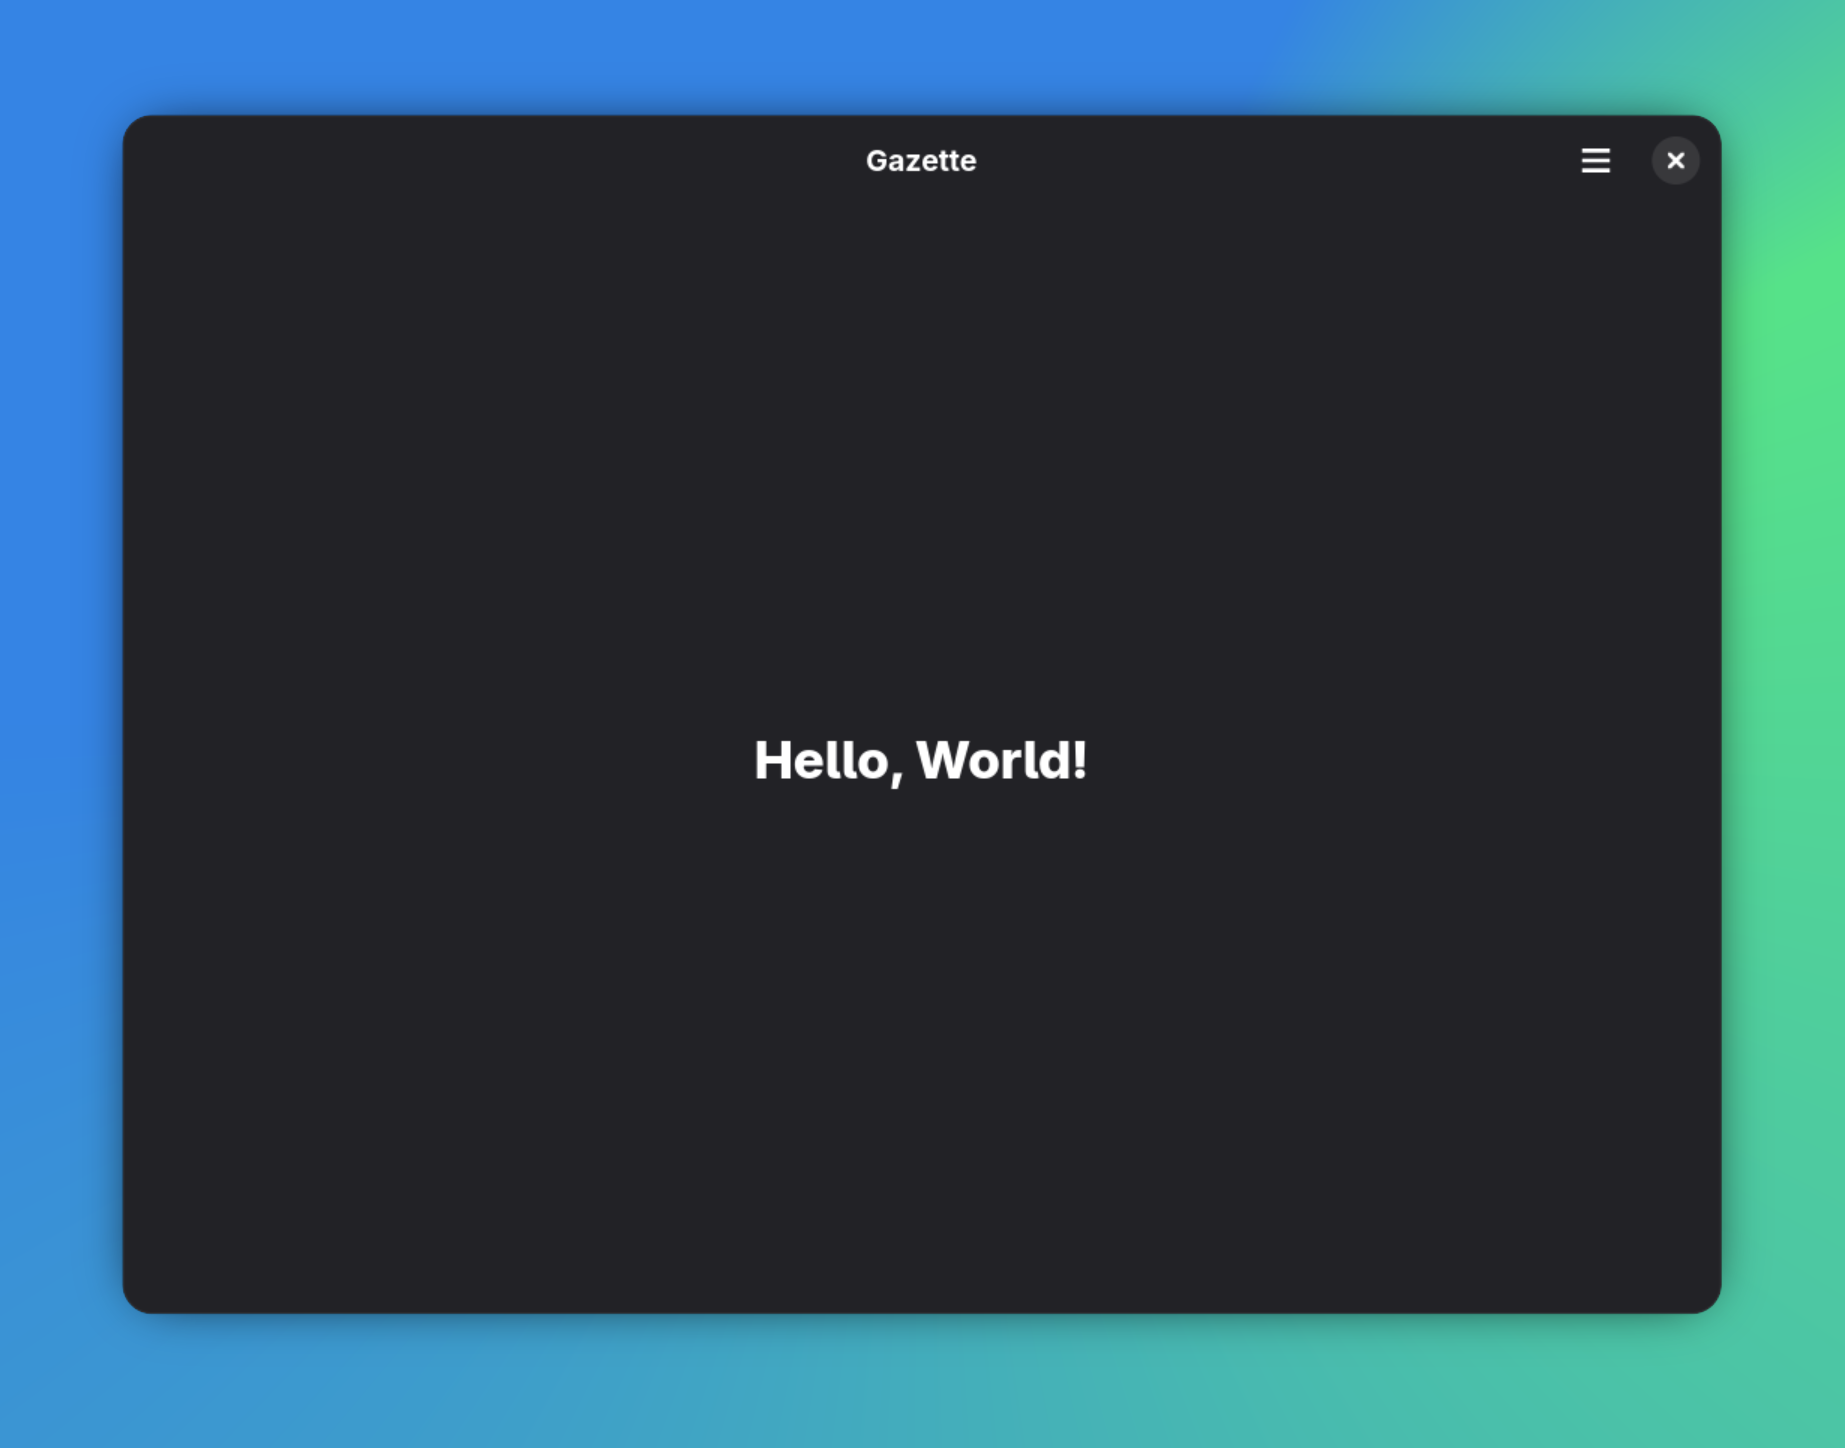
A window. A header bar with a title. A hamburger menu with Preferences, Keyboard Shortcuts, and About entries. A “Hello, World!” label in the centre. That’s your application.
It doesn’t look like much yet, but there’s a surprising amount happening behind the scenes. Let’s look at what Builder actually created.
The project structure
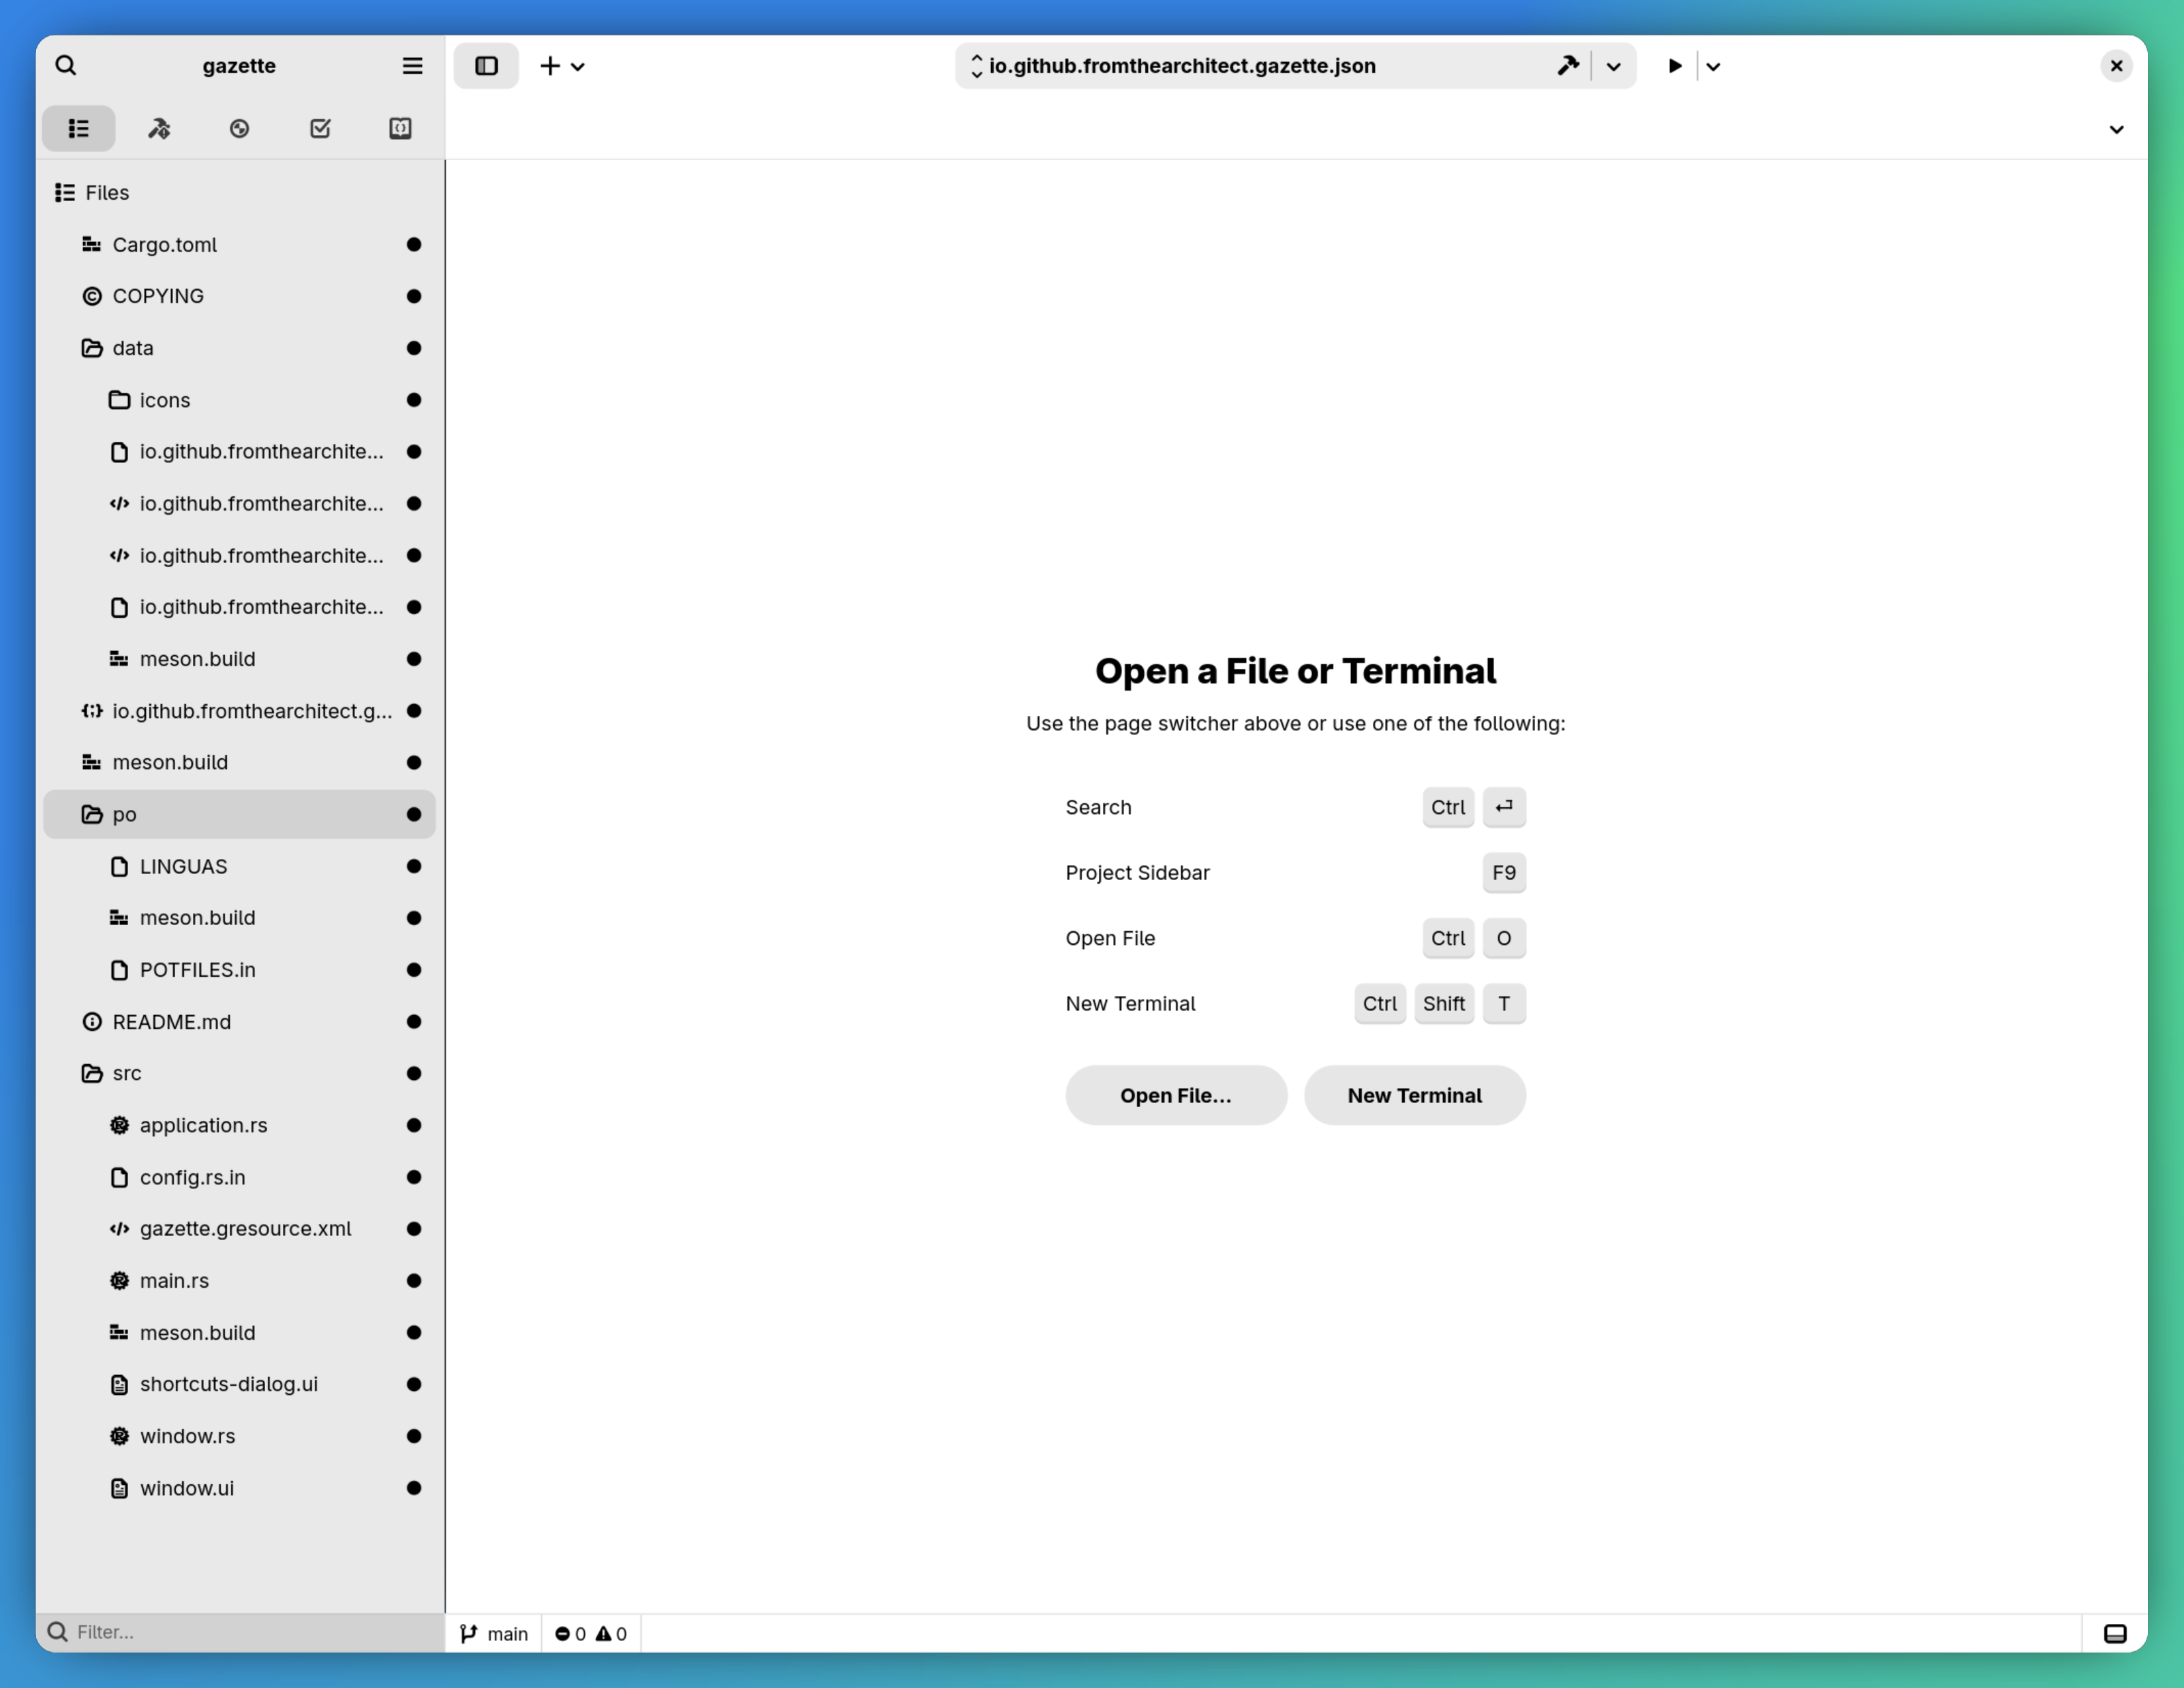
Here’s what Builder generated:
gazette/
├── Cargo.toml
├── COPYING
├── meson.build
├── io.github.fromthearchitect.gazette.json
├── data/
│   ├── meson.build
│   ├── icons/
│   │   ├── meson.build
│   │   ├── hicolor/scalable/apps/
│   │   │   └── io.github.fromthearchitect.gazette.svg
│   │   └── hicolor/symbolic/apps/
│   │       └── io.github.fromthearchitect.gazette-symbolic.svg
│   ├── io.github.fromthearchitect.gazette.desktop.in
│   ├── io.github.fromthearchitect.gazette.gschema.xml
│   ├── io.github.fromthearchitect.gazette.metainfo.xml.in
│   └── io.github.fromthearchitect.gazette.service.in
├── po/
│   ├── LINGUAS
│   ├── POTFILES.in
│   └── meson.build
└── src/
    ├── meson.build
    ├── main.rs
    ├── application.rs
    ├── config.rs.in
    ├── window.rs
    ├── window.ui
    ├── shortcuts-dialog.ui
    └── gazette.gresource.xml
That’s a lot of files for “Hello, World!” — and every single one of them is there for a reason. Here’s what’s in each group.
The Rust source code
main.rs — the entry point
mod application;
mod config;
mod window;

use self::application::GazetteApplication;
use self::window::GazetteWindow;

use config::{GETTEXT_PACKAGE, LOCALEDIR, PKGDATADIR};
use gettextrs::{bind_textdomain_codeset, bindtextdomain, textdomain};
use gtk::{gio, glib};
use gtk::prelude::*;

fn main() -> glib::ExitCode {
    // Set up gettext translations
    bindtextdomain(GETTEXT_PACKAGE, LOCALEDIR)
        .expect("Unable to bind the text domain");
    bind_textdomain_codeset(GETTEXT_PACKAGE, "UTF-8")
        .expect("Unable to set the text domain encoding");
    textdomain(GETTEXT_PACKAGE)
        .expect("Unable to switch to the text domain");

    // Load resources
    let resources = gio::Resource::load(
        PKGDATADIR.to_owned() + "/gazette.gresource"
    ).expect("Could not load resources");
    gio::resources_register(&resources);

    let app = GazetteApplication::new(
        "io.github.fromthearchitect.gazette",
        &gio::ApplicationFlags::empty(),
    );

    app.run()
}
Three things happen here before the application starts:
Gettext initialisation. This wires up the translation system so that strings marked as translatable in the UI files and source code can be looked up in the user’s language. Even if you never translate your app, the plumbing needs to be in place.
Resource loading. The compiled GResource bundle (containing the UI templates, icons, and other assets) is loaded from disk and registered globally. After this call, any code can access bundled files by their resource path — for example,
/io/github/fromthearchitect/gazette/window.ui.Application creation and run.
GazetteApplication::new()creates our application object, andapp.run()hands control to the GLib main loop. The main loop processes events — user input, window management, D-Bus messages — until the application quits.
The config module isn’t a regular Rust file — it’s generated at build time by Meson from a template. More on that shortly.
application.rs — the GtkApplication subclass
This is where you’ll recognise the GObject patterns from Part 2:
use gettextrs::gettext;
use adw::prelude::*;
use adw::subclass::prelude::*;
use gtk::{gio, glib};

use crate::config::VERSION;
use crate::GazetteWindow;

mod imp {
    use super::*;

    #[derive(Debug, Default)]
    pub struct GazetteApplication {}

    #[glib::object_subclass]
    impl ObjectSubclass for GazetteApplication {
        const NAME: &'static str = "GazetteApplication";
        type Type = super::GazetteApplication;
        type ParentType = adw::Application;
    }

    impl ObjectImpl for GazetteApplication {
        fn constructed(&self) {
            self.parent_constructed();
            let obj = self.obj();
            obj.setup_gactions();
            obj.set_accels_for_action("app.quit", &["<control>q"]);
        }
    }

    impl ApplicationImpl for GazetteApplication {
        fn activate(&self) {
            let application = self.obj();
            let window = application.active_window().unwrap_or_else(|| {
                let window = GazetteWindow::new(&*application);
                window.upcast()
            });
            window.present();
        }
    }

    impl GtkApplicationImpl for GazetteApplication {}
    impl AdwApplicationImpl for GazetteApplication {}
}

glib::wrapper! {
    pub struct GazetteApplication(ObjectSubclass<imp::GazetteApplication>)
        @extends gio::Application, gtk::Application, adw::Application,
        @implements gio::ActionGroup, gio::ActionMap;
}
Same pattern as Part 2’s Feed: an inner type in mod imp that holds the state, ObjectSubclass to register it with GObject, and a glib::wrapper! macro to create the outer type. The difference is what we’re subclassing — adw::Application instead of glib::Object — and the trait implementations that come with it.
ObjectImpl::constructed is called once when the application is first created. It’s the place to set up actions and keyboard shortcuts. This is analogous to a constructor, but in GObject-land, construction happens in phases — constructed runs after all properties have been set.
ApplicationImpl::activate is the most important callback. It’s called when the application is launched (or when the user tries to open a second instance). The pattern here is standard: check if there’s already a window, create one if there isn’t, and present it. This is how GNOME apps implement single-instance behaviour — the platform enforces one running instance per application ID, and subsequent launches just activate the existing one.
The impl GtkApplicationImpl and impl AdwApplicationImpl lines are empty but required. They tell the GObject type system that we’re implementing the full trait chain from gio::Application through gtk::Application to adw::Application. If you leave one out, you’ll get a compile error.
Further down in the file, there’s the actions setup and the About dialog:
impl GazetteApplication {
    pub fn new(application_id: &str, flags: &gio::ApplicationFlags) -> Self {
        glib::Object::builder()
            .property("application-id", application_id)
            .property("flags", flags)
            .property("resource-base-path",
                       "/io/github/fromthearchitect/gazette")
            .build()
    }

    fn setup_gactions(&self) {
        let quit_action = gio::ActionEntry::builder("quit")
            .activate(move |app: &Self, _, _| app.quit())
            .build();
        let about_action = gio::ActionEntry::builder("about")
            .activate(move |app: &Self, _, _| app.show_about())
            .build();
        self.add_action_entries([quit_action, about_action]);
    }

    fn show_about(&self) {
        let window = self.active_window().unwrap();
        let about = adw::AboutDialog::builder()
            .application_name("Gazette")
            .application_icon("io.github.fromthearchitect.gazette")
            .developer_name("Unknown")
            .version(VERSION)
            .developers(vec!["Unknown"])
            .translator_credits(&gettext("translator-credits"))
            .copyright("© 2026 Unknown")
            .build();

        about.present(Some(&window));
    }
}
Notice the placeholder values — developer_name("Unknown"), developers(vec!["Unknown"]), copyright("© 2026 Unknown"). Builder generates these as placeholders. Replace them with your actual name before publishing your app.
GActions are GNOME’s action system. Instead of connecting button clicks directly to functions, you define named actions (app.quit, app.about) and connect UI elements to those names. The menu items in the UI template reference app.about — the action system routes that to show_about(). This decoupling means you can trigger the same action from a menu, a keyboard shortcut, a command-line argument, or a D-Bus message.
The resource-base-path property tells the application where to look for automatically loaded resources. When we set it to /io/github/fromthearchitect/gazette, the application will automatically load the shortcuts dialog from that path without us doing anything extra.
window.rs — the application window
use gtk::prelude::*;
use adw::subclass::prelude::*;
use gtk::{gio, glib};

mod imp {
    use super::*;

    #[derive(Debug, Default, gtk::CompositeTemplate)]
    #[template(resource = "/io/github/fromthearchitect/gazette/window.ui")]
    pub struct GazetteWindow {
        #[template_child]
        pub label: TemplateChild<gtk::Label>,
    }

    #[glib::object_subclass]
    impl ObjectSubclass for GazetteWindow {
        const NAME: &'static str = "GazetteWindow";
        type Type = super::GazetteWindow;
        type ParentType = adw::ApplicationWindow;

        fn class_init(klass: &mut Self::Class) {
            klass.bind_template();
        }

        fn instance_init(obj: &glib::subclass::InitializingObject<Self>) {
            obj.init_template();
        }
    }

    impl ObjectImpl for GazetteWindow {}
    impl WidgetImpl for GazetteWindow {}
    impl WindowImpl for GazetteWindow {}
    impl ApplicationWindowImpl for GazetteWindow {}
    impl AdwApplicationWindowImpl for GazetteWindow {}
}

glib::wrapper! {
    pub struct GazetteWindow(ObjectSubclass<imp::GazetteWindow>)
        @extends gtk::Widget, gtk::Window, gtk::ApplicationWindow,
                 adw::ApplicationWindow,
        @implements gio::ActionGroup, gio::ActionMap;
}

impl GazetteWindow {
    pub fn new<P: IsA<gtk::Application>>(application: &P) -> Self {
        glib::Object::builder()
            .property("application", application)
            .build()
    }
}
The @implements list above is truncated for readability — the actual generated code also includes gtk::Accessible, gtk::Buildable, gtk::ConstraintTarget, gtk::Native, gtk::Root, gtk::ShortcutManager. See the source on the part-3 branch for the full version.
This introduces two new concepts: composite templates and the widget trait chain.
#[derive(gtk::CompositeTemplate)] connects this Rust struct to a UI definition file. The #[template(resource = "...")] attribute tells GTK where to find the template, and #[template_child] fields create typed references to named widgets in that template. Here, self.label gives us direct access to the GtkLabel widget with id="label" defined in the UI file.
The class_init and instance_init functions bind the template at the class level (once) and initialise it for each instance. This is boilerplate that every composite template widget needs.
The trait chain — WidgetImpl, WindowImpl, ApplicationWindowImpl, AdwApplicationWindowImpl — reflects the GTK class hierarchy. AdwApplicationWindow extends gtk::ApplicationWindow, which extends gtk::Window, which extends gtk::Widget. Each level of the hierarchy can override behaviour. For now, all these implementations are empty, but they must be present.
The UI template
window.ui
<?xml version="1.0" encoding="UTF-8"?>
<interface>
  <requires lib="gtk" version="4.0"/>
  <requires lib="Adw" version="1.0"/>
  <template class="GazetteWindow" parent="AdwApplicationWindow">
    <property name="title" translatable="yes">Gazette</property>
    <property name="default-width">800</property>
    <property name="default-height">600</property>
    <property name="content">
      <object class="AdwToolbarView">
        <child type="top">
          <object class="AdwHeaderBar">
            <child type="end">
              <object class="GtkMenuButton">
                <property name="primary">True</property>
                <property name="icon-name">open-menu-symbolic</property>
                <property name="tooltip-text"
                          translatable="yes">Main Menu</property>
                <property name="menu-model">primary_menu</property>
              </object>
            </child>
          </object>
        </child>
        <property name="content">
          <object class="GtkLabel" id="label">
            <property name="label"
                      translatable="yes">Hello, World!</property>
            <style>
              <class name="title-1"/>
            </style>
          </object>
        </property>
      </object>
    </property>
  </template>
  <menu id="primary_menu">
    <section>
      <item>
        <attribute name="label"
                   translatable="yes">_Preferences</attribute>
        <attribute name="action">app.preferences</attribute>
      </item>
      <item>
        <attribute name="label"
                   translatable="yes">_Keyboard Shortcuts</attribute>
        <attribute name="action">app.shortcuts</attribute>
      </item>
      <item>
        <attribute name="label"
                   translatable="yes">_About Gazette</attribute>
        <attribute name="action">app.about</attribute>
      </item>
    </section>
  </menu>
</interface>
This is GTK’s XML-based UI definition format.
The <template> element defines a composite template — it’s bound to the GazetteWindow class we defined in Rust. The parent attribute must match the ParentType in our ObjectSubclass implementation.
The widget hierarchy is:
AdwToolbarView— a libadwaita container that manages header bars and content areasAdwHeaderBar(top) — the standard GNOME header bar with the window title and controlsGtkMenuButton— the hamburger menu button in the top-right corner
GtkLabel(content) — our “Hello, World!” text
The <menu> element defines the hamburger menu model. Each item has a label (the _ prefix marks the keyboard accelerator character) and an action name. The app.about entry maps back to the action we defined in application.rs. The app.preferences action isn’t connected yet — clicking it does nothing. The app.shortcuts action, however, already works: GTK automatically loads shortcuts-dialog.ui from the resource base path we set in application.rs. We’ll wire up preferences in a later post.
The translatable="yes" attribute on strings marks them for extraction by gettext. Even if you don’t plan to translate your app initially, marking strings as translatable from the start saves you from a painful retrofit later.
In Part 4, we’ll convert this XML template to Blueprint, which is dramatically more readable. But it’s worth understanding the XML format first, since Blueprint compiles to it — and when things go wrong, the error messages reference XML structures.
The build system
GNOME apps don’t use Cargo as the top-level build system. They use Meson. Cargo still compiles the Rust code, but Meson orchestrates everything else — and there’s a lot of “everything else” in a GNOME app.
Root meson.build
project('gazette', 'rust',
          version: '0.1.0',
    meson_version: '>= 1.0.0',
  default_options: [ 'warning_level=2', 'werror=false', ],
)

i18n = import('i18n')
gnome = import('gnome')

subdir('data')
subdir('src')
subdir('po')

gnome.post_install(
     glib_compile_schemas: true,
    gtk_update_icon_cache: true,
  update_desktop_database: true,
)
The root build file declares the project, imports the i18n and gnome Meson modules, and includes three subdirectories. The post_install block runs after installation to compile GSettings schemas, update the icon cache, and refresh the desktop file database. These are standard GNOME post-install steps — without them, your app’s icon won’t appear in the application launcher and your settings won’t be accessible.
src/meson.build — where Rust meets Meson
pkgdatadir = get_option('prefix') / get_option('datadir') / meson.project_name()
gnome = import('gnome')

gnome.compile_resources('gazette',
  'gazette.gresource.xml',
  gresource_bundle: true,
  install: true,
  install_dir: pkgdatadir,
)

conf = configuration_data()
conf.set_quoted('VERSION', meson.project_version())
conf.set_quoted('GETTEXT_PACKAGE', 'gazette')
conf.set_quoted('LOCALEDIR', get_option('prefix') / get_option('localedir'))
conf.set_quoted('PKGDATADIR', pkgdatadir)

configure_file(
    input: 'config.rs.in',
    output: 'config.rs',
    configuration: conf
)
Here’s what it handles:
Compiles GResources. The
gazette.gresource.xmlmanifest lists the UI files and other assets that should be bundled. Meson compiles them into a single binary blob (gazette.gresource) and installs it alongside the binary.Generates
config.rs. Theconfig.rs.intemplate contains placeholders like@VERSION@and@PKGDATADIR@. Meson replaces them with real values at build time. This is how the Rust code knows where to find its installed resources — the paths are baked in at compile time.Invokes Cargo. Further down in the file, Meson runs
cargo buildwith the right flags and copies the resulting binary to the install location.
gazette.gresource.xml
<?xml version="1.0" encoding="UTF-8"?>
<gresources>
  <gresource prefix="/io/github/fromthearchitect/gazette">
    <file preprocess="xml-stripblanks">window.ui</file>
    <file preprocess="xml-stripblanks">shortcuts-dialog.ui</file>
  </gresource>
</gresources>
This manifest lists every file that should be compiled into the GResource bundle. The prefix attribute defines the virtual path — when our window template asks for /io/github/fromthearchitect/gazette/window.ui, it’s loading from this bundle, not from the filesystem. The xml-stripblanks flag tells Meson to strip whitespace from the XML before bundling. It makes no real difference for an app this size, but it’s standard practice and every GNOME app does it.
Whenever you add a new UI file, icon, or CSS stylesheet, it needs to be listed here.
Desktop integration files
The data/ directory contains files that integrate your application with the Linux desktop. None of these are specific to GNOME or GTK — they’re freedesktop.org standards used across all Linux desktop environments.
Desktop file
[Desktop Entry]
Name=Gazette
Exec=gazette
Icon=io.github.fromthearchitect.gazette
Terminal=false
Type=Application
Categories=Utility;
Keywords=GTK;
StartupNotify=true
DBusActivatable=true
This tells the desktop environment how to launch your app, what icon to display, and what category to put it in. The .in suffix on the source file means Meson processes it through gettext to produce translated versions.
DBusActivatable=true means the app can be launched via D-Bus, which enables the single-instance behaviour we saw in application.rs.
GSettings schema
<schemalist gettext-domain="gazette">
  <schema id="io.github.fromthearchitect.gazette"
          path="/io/github/fromthearchitect/gazette/">
  </schema>
</schemalist>
GSettings is GNOME’s configuration system — think of it as a typed key-value store for application preferences. The schema is empty now, but when we add user preferences (feed refresh interval, dark mode preference, etc.), this is where we’ll define them.
AppStream metadata
The metainfo file is what Flathub and GNOME Software actually read when they display your app. Get it wrong and your app looks abandoned regardless of how polished the code is. Builder generated a placeholder — we’ll fill it in properly when we prepare for Flathub submission in Part 9.
D-Bus service file
[D-BUS Service]
Name=io.github.fromthearchitect.gazette
Exec=@bindir@/gazette --gapplication-service
This tells D-Bus how to activate your application on demand. The @bindir@ placeholder is replaced by Meson at build time with the actual installation path.
The Flatpak manifest
{
    "id" : "io.github.fromthearchitect.gazette",
    "runtime" : "org.gnome.Platform",
    "runtime-version" : "48",
    "sdk" : "org.gnome.Sdk",
    "sdk-extensions" : [
        "org.freedesktop.Sdk.Extension.rust-stable"
    ],
    "command" : "gazette",
    "finish-args" : [
        "--share=network",
        "--share=ipc",
        "--socket=fallback-x11",
        "--device=dri",
        "--socket=wayland"
    ],
    ...
}
This defines how to build and sandbox the application as a Flatpak. The key fields:
runtimeandruntime-version: The GNOME platform libraries your app links against at runtime. Version 48 corresponds to GNOME 48.sdk: The matching SDK used at build time, which includes header files and development tools.sdk-extensions: Additional SDK components — here, the Rust toolchain.finish-args: The sandbox permissions your app needs. Network access, Wayland display, GPU acceleration. Every permission you add here needs to be justified when you submit to Flathub. You might wonder why an RSS reader needs--device=dri— GTK4 uses GPU-accelerated rendering by default, so it’s a legitimate permission for virtually any GTK4 app.
Upgrading to the GNOME 50 platform
Builder generated this project against GNOME 48 — that’s what the current template targets. But in Part 1, we installed the GNOME 50 SDK. Let’s upgrade the Rust crates and Flatpak runtime to match.
Three files need changes:
1. Cargo.toml — Rust crate versions
The generated Cargo.toml uses gtk4 0.9 and libadwaita 0.7:
[dependencies]
gettext-rs = { version = "0.7", features = ["gettext-system"] }
gtk = { version = "0.9", package = "gtk4", features = ["gnome_47"] }

[dependencies.adw]
package = "libadwaita"
version = "0.7"
features = ["v1_6"]
Update it to the latest versions:
[dependencies]
gettext-rs = { version = "0.7", features = ["gettext-system"] }
gtk = { version = "0.11", package = "gtk4", features = ["gnome_50"] }
adw = { version = "0.9", package = "libadwaita", features = ["v1_9"] }
The version numbers here are the Rust crate versions, not the GTK version. gtk4 crate 0.11 wraps GTK 4.18, and libadwaita crate 0.9 wraps libadwaita 1.9. The gnome_50 feature flag is a convenience flag that enables all the version-specific API features matching the GNOME 50 SDK — it saves you from having to figure out which individual v4_xx flags correspond to which GNOME release.
2. Flatpak manifest — runtime version
In io.github.fromthearchitect.gazette.json, update the runtime version:
{
    "runtime-version" : "50",
}
This tells Flatpak to use the GNOME 50 runtime and SDK when building and running your app.
3. Rebuild
Hit Run in Builder again. Builder will download the GNOME 50 SDK if it’s not already installed, rebuild the project against the new dependencies, and launch the app. If everything compiles and runs — and it should, since we haven’t used any version-specific APIs yet — you’re on the latest platform.
This kind of version bump is something you’ll do roughly every six months as GNOME releases new platform versions. Getting comfortable with it now means it’s routine rather than stressful later.
What we have so far
The thing that takes longest to internalise when you start GNOME development is how much of this is not GTK. The desktop file, the D-Bus service, the AppStream metadata, GSettings — these are platform concerns, not application concerns. Builder stitches them all together, but you need to know what they are and why they exist, or you’ll never debug a broken Flatpak submission.
The application ID is the load-bearing string across all of it. It ties the desktop file to the D-Bus service to the GSettings schema to the Flatpak bundle. Getting this scaffolding right by hand would take hours of cross-referencing documentation. Builder gives it to you in thirty seconds.
What comes next
We’ve got a running app, but the UI is still “Hello, World!”. Before we start building the actual RSS reader interface, we need a better way to describe user interfaces than raw XML.
In Part 4, we’ll introduce Blueprint — a markup language that compiles to GTK’s UI XML but is dramatically more readable. We’ll convert the generated window template to Blueprint, build the initial Gazette layout with a sidebar and content pane, and start making it look like a real application.
The source code at the end of this post lives on the part-3 branch of fromthearchitect/gnome-rust-gazette. Subsequent posts in this series build on the same repo, with a branch per part.